


First of all

INSTALLATION

CUTTING AND DRILLING

CLEANING AND MAINTENANCE

RECYCLING

AFTER-SALES SERVICE
The following recommendations shall be taken into account before any surface laying operations are started:
- Check that the boxes have no impact or breakage caused by transport. If so, you can contact us at i'm not going to lie, sending us a photo showing the damage, your name and order ID. We'll be in touch as soon as possible.
- If the tiles are defective, they should be detected before installation. We therefore recommend that you thoroughly review the material before performing the work. Claims for costs of starting up or installing equipment already installed shall not be accepted under any circumstances.
- Check that the pitch and caliber of the material is correct, taking into account that slight pitch differences may occur without affecting the final result.
- If you need to order more material from previously purchased tiles, you must indicate the date of purchase and order number, so that we can try to supply you with the same or the closest batch of material to the product already purchased. Not always possible.
For that reason, we recommend keeping the purchase receipts.
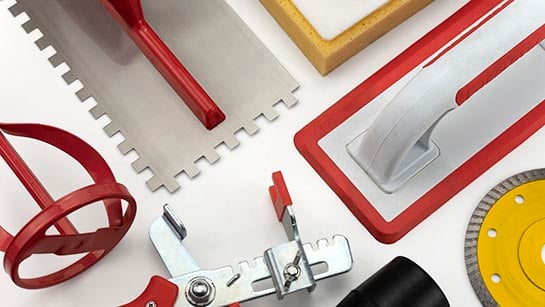
To lay ceramic tiles correctly, you will need a series of support instruments that will make your work easier. They are shown in the following image:
TOOLS FOR FIXING CERAMIC TILES


TOOLS FOR FINISHING


- Check that the surface is consistent, clean and dry.
- It is essential to have perfectly flat surfaces. If there are significant unevennesses in the substrate, a levelling layer must be applied.
- If intermediate layers of insulation or waterproofing are to be applied, consult the specific installation instructions for these products.
- Plan the master line orthogonally to the surface.
- Correctly manipulates pieces using appropriate tools if required by piece size.
- Select the layout of the pieces.
Tile adhesive is a technical adhesive designed for fixing ceramic tiles. There are different varieties of adhesive cement depending on the type of ceramic tile you want to fix (white body, porcelain tile, etc.), the place of installation (indoor or outdoor), and even the climate in which the product is going to be exposed (humid areas, heat, ice, etc.).
Both the adhesive and the grout are part of the tiling and we should apply those suitable for their use and type of ceramic product. To make your choice easier, you can download the following table and see the types of bonding materials recommended depending on the type of surface to be tiled.
> HOW TO CHOOSE THE BONDING MATERIAL
To prepare the cement you have to:
- Mix the bonding material with water according to the proportion indicated by the manufacturer, taking into account the application time.
- Pour the cement into a pot until you obtain the right texture to install the tile correctly.
- Spread the bonding cement with the help of the notched trowel on the surface to be tiled.
- Also spread the bonding cement on the edge of the ceramic tile.
- Using a notched trowel (with a width of notches of 10 mm), spread the adhesive perpendicular to the long side of the workpiece. Make sure that the layer of cement is always the same thickness.
- After spreading the tile adhesive, place the supports under the workpieces on all 4 edges. For larger pieces use more supports per edge.
- Place the tile and tap carefully with the rubber mallet.
- Insert the wedges into the space, tightening them without exceeding the breaking point. To make this task easier, it is advisable to use the adjustable pulling clamp (if not available, you can use your hand).
- Once the tile adhesive has set, tap with a rubber mallet or the toe of the foot in the direction of the joint to remove the substrate.
Finally, it is important to carefully consider and plan how the installation will be carried out before starting:
- It is necessary to be clear whether it is necessary to cut pieces, how many and where these cut pieces will be installed (in what margin, with what shape, with what measurements taking into account the space destined for joints, etc.).
- It is also very important to organise the installation of the material and to start laying it from the inside to the outside of the space to be tiled (i.e. from the corner furthest away from the access point to the access point), as it is essential not to step on the tiles when the bonding material or grout is fresh, as this would cause unevenness or defects in the different materials.
PREPARATORY STEPS
Clean the surface thoroughly, especially if it's a floor. Any impurity is an obstacle, making the cleaning process more costly and leaving small gaps in the joints. Gently wipe with a dry cloth if you are regrouting tiles and they are very dirty. If it's a floor, sweep it well to remove remnants of tile adhesive, small stones, or other impurities. If the joints are still dirty after sweeping, use a vacuum cleaner to ensure they are well-covered and free of imperfections.
Remove the adhesive from the ceramic tiles. Ceramic tiles usually have adhesive to prevent breakage during transportation.
Choose the color of the grout and the grain thickness. It can be fine grout, for joint sizes of 3 mm or less, or thick grout, starting from 3 mm. The size is determined by the spacers used to equalize the spacing between the tiles during installation.
MIXING, APPLYING, AND CLEANING THE GROUT
- Apply the mixture with a rubber float. With gloves on, use the rubber float as if you were plastering a wall, like a trowel. Using one of the shorter or side edges, scoop grout directly from the bucket or your other hand and spread it over the joint. This method is better as it causes less mess, making it easier to clean.
- Prepare the mixture, considering the number of joints you need to cover. If unsure, do it gradually. Pour water into the bucket and add grout gradually. Knead until you have a homogeneous, pasty texture—not too dry or hard, nor too watery or soft, to facilitate handling. Keep in mind that it dries very quickly and hardens, making it difficult to clean off excess.
- Clean with gloves, a bucket of abundant water, and a sponge. Dampen the sponge in water and gently rub over the joints once, without pressing too hard to avoid removing the mortar and leaving very concave joints. It's advisable to remove larger excess first, then clean the sponge to make a second pass in the same area. Do it as if you were washing the tiles, but without overdoing it on the joints.
- Let the mortar inside the joints dry. Once the tiles are cleaned, wait 15 to 20 minutes depending on humidity and ambient heat. The edges of the joints on the tiles will appear drier.
- Clean any remaining marks on the tiles with a dry cloth. When the grout is dry, gently rub in circular motions. You can also use a mop, adding a product to remove cement from the tiles. Test first on spare tiles to avoid damaging the installed ones. Use a mask if using this method, as some chemicals can release gases.
A wide variety of tools and accessories are available on the market to perform all the cutting and drilling operations required during installation.
In general, given that the finish of the cut side is not usually perfect, it is advisable to place the pieces in the position where this cut side is least visible (covered by door or window frames, in the inside corners of walls, etc.). Below you will find the tools that are essential for cutting and drilling:
- For most cuts, the manual cutter will do a perfect job.
- Round holes are most easily achieved with an electric drill (without a striker) and a diamond drill bit of the required diameter, keeping the tile firmly fixed in support, and cooling the drill bit with water during the process.
- For square holes, we recommend using an electric cutter, if you don't have one, you can use a manual cutter, although the process is more tedious, and you will need a tungsten carbide punch.
STEPS TO FOLLOW FOR CUTTING TILES
- Scratch with a cutter roller the four sides of the hole on the glazed side.
- Then turn the tile over and scratch these sides also on the bisque (unglazed side) with the punch, making deep grooves but not reaching the glazed side.
- Then, also with the punch and on the bisque, scratch the diagonals of the hole, this time piercing the hole up to the glazed side.
- Finally, with a hard object, hit the tile on the glazed side to remove the four triangles that make up the hole.
CUTTING ON SPECIAL PIECES
- Always use an electric cutter for cutting special pieces (mouldings, bombatos, etc.).
- Miter cuts can also be made with a manual cutter and the appropriate tool, although the result is always better with an electric cutter.
To guarantee the good condition of the ceramic tiles and special pieces during the entire period of use, it is necessary to follow the cleaning and maintenance instructions. It is recommended to take frequent care in the maintenance of the ceramic pieces, preserving and protecting them from aggressive elements or environments, and avoiding abrasive cleaning methods and products.
- To remove general dirt on floors and coverings, hot water, cloths or sponges, mops or organic solvents can be used.
- In the first cleaning on site, never use scouring pads.
- The manufacturer's instructions should always be followed, in the case of specific cleaners, and the use of hydrochloric acids should be avoided.
- For parts with metal applications, it is recommended to avoid the use of acidic cleaners.
During their use, the parts may come into contact with more specific dirt that requires a particular cleaning. For this purpose, in the following table, we inform you about a wide range of specific products for each type of stain. Please pay attention to the recommendations for use and, if necessary, ask our customer service for instructions.
TABLE _ CLEANING PRODUCTS
Before attempting to remove a stain with aggressive agents, we recommend checking its effect on the surface of the tile or flooring and the grout in a confined, non-visible area to prevent significant degradation or changes to the surface of the tile.
Maintenance is the key to protecting ceramic tiles so that they continue to maintain all their properties and look intact over the years. To do this, just follow a few simple guidelines:
- It is important to keep the surfaces clean to avoid scratching the pavement.
- If we have to move heavy items, we recommend using mats to protect the floor.
- We must prevent heavy or sharp objects from falling.
- We always recommend that you save any leftover pieces, in case you need to replace them in the future. If it has been a long time since it was installed, it may be difficult to obtain the same material.
Polished porcelain floor tiles are more susceptible to staining by certain liquids due to their polishing process where the micropores of the surface are opened. In this case, it is very important that any agent that could affect them (oils, soft drinks, alcoholic beverages, and acids), is cleaned with water as soon as possible so that the agent cannot stain the floor. If the stain remains exposed for a long time, the pavement may be affected.
For good maintenance of the pavement, it is advisable to use a neutral detergent with high cleaning power, such as FilaCleaner.
In special complementary pieces where metals, polishes, glass, etc. have been used, they may present particular characteristics (slight variations in tone, oxidation in contact with air and humidity, aged appearance over time...).
Rectified and/or meshed materials should be handled with care to prevent chipping at the edges and surface scratches.
The complementary pieces are unsuitable for outdoor installation, except those that are born of its base which are recommended for placement in outdoor areas.
SITE CLEANUP
- Prevent the setting of the fixing material on the workpiece (clean before 24 hours).
- Remove the remains of the fixing material (cement, grout, etc.) with a sponge and abundant water.
- Do not use any abrasive product, neither acid nor alkaline-based application, to avoid any loss of appearance or surface attack.
- Do not use products containing hydrochloric acid or scouring pads that could damage the surface of the pieces.
Both our packaging and our products are recyclable, so we recommend that you use the selective collection points. Please, follow the waste management regulations and the specific premises for "packaging waste" and "ceramic tiles" applicable in your country.
Ceramic Connection recommends that all work should be carried out following the instructions of Standard UNE 13800:2017 General Rules for the execution of adhered ceramic tiles.
According to the CTE (Technical Building Code), it is the direct responsibility of the construction manager or, failing that, of the purchaser, to supervise and check the material supplied (quality of the material, condition of the packaging, match between the documentation supplied and the service product, etc.).
No returns or claims will be accepted for products already installed, following the Current Legislation.
Any anomaly in the quality of the product must be communicated to the Customer Service Department. To claim about the product, it will be necessary to indicate the model, format, tone, calibre, physical evidence of the product, its product ID indicated on the packaging and the purchase invoice, as well as any other evidence, which is interesting to add in the contact form > subject claims or via e-mail at the address info@ceramicconnection.es.
Claims will only be accepted in those cases in which the recommendations we make for the installation, use and maintenance of our products have been followed.